Friday, July 26, 2013

Easy Peasy!


One of my favorite garden crops is snow peas.  These are called “Melting Sugar”.  Home-grown snow peas are crisper than the ones I find in the produce aisle of the grocery store.  Those are always a little wilty from sitting around.  Mine stay crisp in the vegetable drawer for at least a week as I accumulate enough from daily pickings for a stir fry or salad.

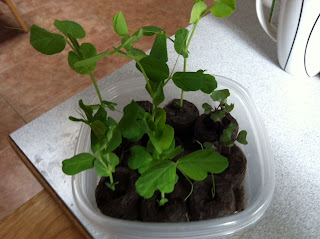
As shown in the picture, snow peas can be grown in largish containers.  Simply plant and water. Easy peasy -- anyone with a 3 x 6 deck or sunny spot can do it.  They (the peas, not the gardeners) need something to climb on, like a trellis.  A couple of years ago, the local birds discovered the sprouts and left them looking like they’d been attacked by tiny scissors.  After that, I draped the trellis with bird netting.  That seems to solve the problem, and the peas like to climb on the netting as well.  They make a nice green and edible privacy screen.

I pick the pods when they are 3-4 inches long.  When they get going, they should be picked once or twice a day.  I like to snip off the ends, and pull off the strings if there are any. I cut them into 1 ½ inch pieces and toss in near the end of a stir fry so they just warm through or add them raw to a salad.

Quinoa salad is a summer favorite at our house.  I start with leftover quinoa and mix in a little balsamic vinaigrette to keep it from sticking together.  Mix in chopped snow peas, cucumber, sweet pepper, cherry tomatoes, and any other raw vegetables you enjoy.  Before serving, mix in a little more vinaigrette and some cubed cheese and chopped avocado.  Instead of the cheese, you could add cubed cooked chicken or ham.  If you don’t care for quinoa, you could substitute rice or pasta.  When I make this with pasta, I marinate the salad in Italian dressing, then add ranch dressing at the end to coat the pasta and make the dressing a little creamy.  These are two cool summer salads that we enjoy when the temps reach the 90s, like they have this week.

Regrettably, my peas don’t care for the hot weather, so they are done for the season.  When the pods start to get thick and curl, it’s off to the composter for them.


Saturday, May 18, 2013

Into the Ground


We’ve been having a leap-frog spring, one in which the temperatures have hopped over the normal highs in the 60s and 70s right to the 80s. That might seem like a good thing for a gardener, but really it’s not, because it just makes me feel like I’m a month behind, when according to the calendar, I’m really  a little ahead of schedule.  Normally, I gauge my planting of tender annuals and heat-lovers like tomatoes and peppers by a last-frost date around Mothers’ Day.  This year, Mothers’ Day is on the early side, but our highs from two weeks ago (60s) are suddenly our lows.  Cool season plants, like Swiss chard and snow peas, are fainting like Victorian ladies at a Chippendales’ show.   My tomato and pepper seedlings are not ready for this kind of intensity; they look like beach bunnies who forgot their sunscreen. 

Homeless seedlings
I’m trying to get my seedlings into the ground, but starts need a week of gradual acclimatization in the real outdoor sun, adding an hour or two per day.  That’s why some of these are looking a little beat up.  A week of travel to California left them neglected, and I lost a few.  The real challenge is that I started cucumbers and squash at the same time and neglected to mark them carefully.  I’m assuming that the cucumbers were the most sensitive and succumbed, but I can’t tell, at this time, which ones survived.  I bought more cucumbers, so come harvest time, I may be surprised to have more cucumbers that I planned on.  

  
I added potatoes to my garden this year, but no sprouts are showing yet.  This is making me very nervous, but I’m resisting the temptation to excavate to see what’s happening.  

Potatoes should appear here^

While cleaning out the raised bed, I found a couple of over-wintered onions and, gift from some passing bird, a volunteer strawberry. 

The way that nature perpetuates itself always makes me smile. We have a clump of strawberries right below the spot under the eaves where birds nest every year.  The only explanation I can think of is that the birds were eating the strawberries that were planted on the other side of the yard and “deposited” the seeds below their nest. 

Saturday, April 13, 2013

Signs of Spring


first starts


Spring comes late in the Pacific Northwest, with many false starts and broken promises.  A bright, sunny day reaching toward temperatures in the seventies will be followed by an inch of snow or a bruising hail storm.  The most reliable “last frost date” is around Mothers’ Day, so our growing season is brief and gardeners try to make the most efficient use of the growing time they do have. As a result, we are now in that seasonal limbo known as “indoor seed starting” that results from our illicit love affairs with seed catalogs.  Lesser gardeners may prefer to wait for the seedlings to appear in garden shops, but the variety and provenance of these is limited.  There is so much to know about new varieties that won’t fit on the little plastic tags that are inserted into the soil surrounding the garden-center plants, whereas the catalogs seduce us with the details of days to maturity, growth habits, and special characteristics of each type of seed. Seedlings from a store are o.k., but really, you don’t know how they’ve been treated or what they’re capable of.


"Scout the Destroyer"
If you start your own seeds indoors, you can choose fewer plants of a larger variety of tomatoes or cucumbers, instead of committing to six of one type.  Also, you can baby the tender ones indoors until the seasons have made up their minds.  In my garden, the birds view those first seedlings as a salad bar placed for their convenience; the first green shoots hardly stand a chance. Plus there is the havoc that the paws of a 100-pound Labradoodle can wreak with one enthusiastic romp through the emerging rows. Because of these considerations, I now have rows of veggie starts lined up under a grow light like race horses in the starting gate, waiting for the first gunshot of spring.


Peat Pellets
I like to use those dehydrated peat pellets because when they are soaked in warm water, they expand in a manner that reminds me of those Fourth of July tablets we would light on fire that produced twirling, writhing ashy “snakes” for our amusement.  Of course, the peat pellets are not quite that dramatic.  They just grow taller and mushy.  They are easy to plant and I think it’s less disruptive for the seedlings’ roots to not be extricated from a pot.  Repurposed clear plastic bakery trays work well as containers, and the lids can be closed to create a steamy little seed sauna for the first week or so until shoots appear. The trays tend to crack once the seedlings gain some weight, but they were trash anyway, right?
Seedlings under growlight

 Once the sprouts get some leaves, they should be placed outdoors (as the weather improves) for longer and longer periods of time to become acclimatized to wind, sun, and cooler temperatures.  This is the process known as “hardening off.” The tricky part is remembering to bring them in before the sun gets too intense or the temperatures approach freezing.  The sight of a sunburned cucumber plant is very sad, and I even had a couple of summer squash plants shrivel on a brisk morning even though their taller, sturdier siblings were fine. They did recover indoors under the grow light but it was a chilling (pun intended) reminder of what can happen.


Ready to Plant!
So now, a month before Mothers’ Day, I’m going to set out some snow peas, Swiss chard, bok choy, and Chinese mustard because they are cold hardy and should tolerate the light frosts we will still get.  Fingers crossed, but I also bought a “blanket” of row cover.

Friday, March 29, 2013

Genius, Part 2


As much as I love these felted slippers, they do have one fatal flaw.  The softness that makes them so cozy , also is not very durable for walking on. 


Add caption
 Sadly, the bottoms wear out fairly quickly.  While they are not terribly expensive or difficult to replace, I just couldn’t toss out something that was only worn out on the bottom.  So I decided to try to save these favorite slippers. 


I cut off the bottoms....
Slipper on left has been surgically altered.


and stitched on a pair of slipper sock soles I had lying around. 

Stitching in progress

I never got around to making the slipper socks, but now I have….


drumroll, please…….


RETREADS! 
 I’m thinking these bad boys should last forever!!

Saturday, March 9, 2013

Genius, I tells ya, genius!


Remember those grade-school aptitude tests where you had to look at a flat diagram with a dot on it and then predict where the dot would be when the diagram was folded into a cube? I   thought I was pretty good at that, but this pattern completely blows me away.  It’s called Midnattsol’s feltedslippers. 
  The pattern starts out as a row of squares knitted in alternating colors with two other squares picked up and knitted on the sides. When stitched together like one of those cube diagrams, it makes a bootie shape. 
 Even after sewing up four of these, I still can’t see how the shape goes together until the last seam.  I can’t imagine being able to visualize and design this pattern, but I love the magic of seeing it take shape.
The best thing about these slippers is that they are felted, which makes them soft and dense.  Felting is also great because it disguises any minor mistakes and sloppy seaming.   Also, the slippers are knit in garter stitch, so, simple even for a beginner. You could make these for friends and let them felt them to custom fit – you can control the shrinkage by monitoring the felting process.
 I love the harlequin design and the way they end up look like jester booties.  I used inexpensive but sturdy Paton’s classicwool.  Two skeins will make a pair of slippers with quite a bit of yarn left over.  Because this yarn felts easily, the leftovers can be used in a variety of ways, which I’ll show you soon.


I’ve already worn out one pair of these slippers and made a second pair. The simplicity and functionality of this design are genius.

Saturday, February 2, 2013

Regarding the Stash

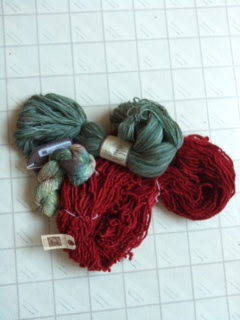
Every self-respecting knitter or quilter has a precious reserve of yarn or fabric known as a “stash”. The stash is a source of pride, reassurance, and bragging rights. It’s where the artist turns for inspiration or for that spark of color or texture to add to a project. However, the stash can take on a life of its own, growing out of control like that sourdough starter we had during the 70s. There are warning signs: Denial: “Oh that – just a little extra yarn I’m saving in case there’s a sheep plague, something like the Irish Potato Famine.” Projection: “I have a friend who bundles fabric to disguise it as pillows and furniture – she really has a problem.” Rationalization: “I might as well buy it now, because if I wait until I need it, it will just be that much more expensive.” There are rational (note the root of the verb rationalize) reasons for stashing: Good quality yarn and fabric are expensive, so a good sale is hard to resist.
Sale Yarn
There is also a little-known principle of physics that works against us: it takes significantly less time and effort to purchase yarn or fabric than it takes to wrangle said fiber into a sweater or quilt. While there are no recorded instances of a stash becoming a "Little Shop of Horrors" life form and actually devouring its owner, when the stash achieves the size where it requires its own room and zip code, clearly something must be done. While quilters and knitters joke about their stash providing insulation in the case of an apocalyptic weather event, we all know there are limits. The stash that seemed like an asset in the past becomes a definite liability when one is considering moving, especially if downsizing. Suddenly, those beguiling colors and textures become overwhelming and oppressive. The first step of reducing the stash might be a “yarn diet”. I’ve been on that diet for about a year, with no obvious shrinking of the stash, probably due in part to some diet exceptions I’ve allowed. First, yarn purchased to use with stash yarn to complete a project. This becomes a dilemma similar to the cereal and milk quandary. Eating a bowl of cereal always leaves about a quarter of a cup of milk in the bottom of the bowl, but if I add cereal, then it seems a little dry, and needs more milk, and so on and so on. Yarn is like that. Few patterns use up all the skeins needed, especially if a little extra was bought for good measure. Odd balls inevitably remain at the end of the project. Second, comes “souvenir yarn”.
Souvenir yarn from NYC, Salt Lake City, and Coer D'Alene
Visiting a local yarn shop is a great way to explore a new city. Yarn shops are often located in interesting shopping districts and the staff is frequently a friendly source of advice about other local sites of interest. Sometimes souvenir yarn appears serendipitously – such as the skein I purchased at a farmers’ market in a sunny meadow of Manhattan’s Union Square. How could I not support a small family operation like Catskill-Merino who produces such lovely skeins as this? So, clearly, the yarn diet is not working. A more intense stash reduction program is necessary. I’m considering “hoarder-avoidance” therapy but haven’t found a counselor who lists “fiber management” as her field of expertise. The program of last-resort is a pact I have with my quilting and knitting friends. It goes like this: when a member of our group moves on to the yarn and quilt shop in the sky, her friends will converge upon her stash and subdivide it into fat-quarters and yarn bundles and distribute them at the wake. Suitable beverages will be provided. In the meantime, I have found some simple patterns that can use a variety of partial skeins and leftovers. The sustainability principle I’m working on this year is “use up what you have.” Details will follow.

Sunday, December 30, 2012

The Intersection of Old and New

A co-worker had a plum tree that was exceptionally productive this year – I spotted her in the hall lugging large grocery bags of heavy fruit. Much like the zucchini fairies who leave overgrown squash on one’s doorstep, she was trying to dispose of share as much of the fruit as possible. These are the plums, purply black Italians, that my grandparents grew in their orchard and argued over – (plums or prunes?) while we cousins lobbed them at each other, leaving a trail of pulp and purple stains. Kids don’t think about waste; they only think about having fun. We were soon enlightened as to the error of our ways. I was delighted to accept a sack of plums and her Plum Crisp recipe. It was excellent, but two people can only eat a limited amount of that. What else? I remember quart jars of dark, sweet canned plums emerging from my grandmother’s dark, dusty cellar. They were my favorite, probably because I had not eaten them in any other form, before Sunsweet’s marketing campaigns. I scoured the internet, and found this recipe which had received rave reviews. They are lovely – amethyst jewels with the spicy, orange-peel infused flavor of Christmas.
I also dried some, thinking they would be nice snipped into bits and mixed into a batch of granola. My friend made savory balsamic plum preserves, so I have another version to try on toasted baguettes. There is a good feeling about having some full jars on the shelf – a squirrel-like satisfaction of knowing that winter will not catch us unprepared. It’s the rhythm of giving and receiving, a nod to the traditions of preserving the bounty of the earth, made easier by easy access to instructions and recipes via the Internet and an Ipad.