Monday, December 16, 2013

Walking the Line


A couple of weeks ago, I was fortunate to spend four days in Manhattan.  It was my second time there, so I had some ideas of things I wanted to do and see.  I was traveling with work colleagues, and we always have the goal of doing as much as possible without causing undue pain or bodily harm, considering the fact that we are mature adults who recognize the body’s need for sleep and moderation in the consumption of both caffeine and alcohol.
Walking above the city streets

We generally walk everywhere, and I think that’s the best way to experience a city.  In addition to the sights, you get the sounds, smells, and even, in New York, the tactile sensation of the crowds bumping and pressing against you.  Walking in Times Square becomes a ballet of twists and turns, dodging and ducking to avoid collisions.  We spent half a day at the Museum of Modern Art, ate breakfast at the Russian Tea Room, attended two Broadway plays, and toured Teddy Roosevelt’s birthplace.   On the last full day there, we climbed 30 feet in the air and walked on the High Line. That was the one thing left on my list of places to see on this trip.

The High Line is a public park located on an elevated railroad line that was built between 1929 and 1934 on the West Side of Manhattan between 10th and 11th Avenues, now running from West 34th Street to Gansevoort Street in the Meat Packing District.  The tracks were elevated to reduce the train-traffic accidents that had given 10th Ave. the nickname, “Death Avenue”.  The High Line was last used as by trains in 1980 and then stood abandoned for almost twenty years. Property owners in the area lobbied to have the tracks torn down, but in 1999, community residents organized to have the area converted into a park.  Friends of the Highline is now a non-profit conservancy which maintains and operates the park. If you go to their website at www.thehighline.org you can see many more (and better) photos of the park.  

On a sunny November morning, we walked about one mile surrounded by over 300 varieties of flowers, trees, shrubs, and grasses.  The views of the city buildings, parks, and local landmarks were spectacular.  In the heart of one of the world’s busiest cities, the Highline is an oasis of beauty and peace.  

View of a tiny Statue of Liberty in the distance
It’s remarkable when someone has the vision to see the potential for beauty something that many would consider a derelict eyesore. Urban parks and green spaces offer both physical and psychological benefits to city dwellers. Frances Kuo of the University of Illinois conducted a study of 28 identical high-rise public housing projects. She found that people living near green spaces had a stronger sense of community, coped better with everyday stress and hardship, were less aggressive and less violent, performed better on tests of concentration, and managed problems more effectively.

The Highline is a wonderful example of reusing a space in a way that sustains all of us.

Sunday, October 13, 2013

It Wanted to Be a Sweater


When I first started knitting, I had unrealistic ambitions and no real idea of how slow a process it is to create a piece of fabric out of what is basically string. I love cotton sweaters, especially oversized ones, and so I bought some cotton yarn at a nearby fabric store.  It was Lion Brand, which was quite reasonably priced, and I bought a skein of the two contrasting colors and two of the main color. (Clearly, I had no idea of the conversion scale of yarn to fabric in either volume or time.) Worsted weight makes for a medium gauge and I worked away for a while, then got sidetracked with other things and the sweater parts languished in a drawer. By the time I got back to it, the yarn had been discontinued – who knew one should buy all the yarn needed for a project at the beginning of the project?  Obviously, not I.  So the partial sweater languished some more.

While obviously we make a sweater stitch by stitch, a felicitous quality of knitting that is not shared by cooking or quilting is that it is also possible to unmake a sweater, stitch by stitch.  Sometimes the unmaking is even more satisfying than the making – it’s certainly quicker.  Then the raw materials can be reused in another more economical pattern.   So my one-third of a cotton sweater is now being reincarnated into more useful items. I started with this kitchen towel from Mason-Dixon Knitting Outside the Lines.  It reminds me of the dishtowels my aunt would embellish with a crochet loop for hanging on the stove or refrigerator handle.
Having a dishtowel, obviously, I need some dish cloths, aka “warshrags”.  These are great projects for beginners to practice on. Besides offering almost instant gratification, making dish cloths is a good way to try out a pattern that might be too intimidating to tackle as a large project, like an afghan or throw. I found this attractive textured pattern called “Flying Geese.”  I love that this pattern is named after a quilt block. It’s all knit and purl stitches and could easily be knit by a beginning knitter who wants to move past scarves. (You know who you are!)

After that, I needed a change. A jeweler told me once that any time an item of gold jewelry is melted down and re-cast, you have to add some new gold. Sort of like sourdough starter, I imagine. I thought this was a good idea for reknitting yarn, too. And it’s a good excuse to buy some new yarn.  So, I bought a variegated skein of Lily Sugar 'n Cream cotton. The two yarns made it possible for me to try a dishcloth version of a pattern I’ve been admiring for a long time, Lizard Ridge. I love the way this pattern looks, but it is a little tricky because it uses short rows to create the wavy ridges.  This pattern requires your full attention for the counting and wrapping.  I’m glad I started with a small version instead of trying to make one big enough to cover a sofa or bed. I feel like that would require zen-like concentration and saintly patience. (I’d better save that for a summer project.) Still, I love the way this looks.


Finally, I picked up some of the contrasting yarn and started a mitered dishcloth.  This is also a square that could be made in multiples and joined into a throw.  I like the contrasting rows and I am planning to make a multi-colored batch of these as a couch throw.  (oooh, more yarn to buy!) 

 But that’s another future project.  

Tuesday, August 20, 2013

Twofers

Stash reduction update:  I had a big bag of Reynolds Cotton Rope.  Actually, I have two bags – one of turquoise and one of orange.  Folks on Ravelry say it’s splitty and it is, because there’s a little thread that seems to be the acrylic that wants to separate and hang out outside the stitch sometimes.  Still, it has a nice crunchy cool cotton feel and the colors are wonderful.  I dove into the bag of turquoise and made this sweater. 


It’s called “Shalom”by Megan McFarlane and is simpler than it looks, at least to me, and knits up pretty quickly.  I learned from my last sweater with garter stitch borders that you should not join a new ball of yarn at the end/beginning of the border.  The tightening of the stitches and weaving in of the ends detracts from the uniform texture of the border.  Possibly more skilled knitters know a better way around this, but I think it works better if you sneak your join in where the garter stitch meets the stockinette. 


Add caption


With the leftover yarn, I made this monster from Rebecca Danger’s The Big Book of KnittedMonsters.  This book is worth having just for the fun stories she writes about the various monsters and where they live.  I’m naming mine “Bluto” (for obvious reasons). He’s made from the “Hugo” pattern.  The blue hair on top was my addition –I think it adds to his personality. Rebecca says to go down a couple of needle sizes below what you need for gauge to give a tight knit for structure and to hold in the stuffing.  Next time I would go even smaller on the needles, because when you stuff the monster, the stitches expand.  Bluto is going into the grandkid’s toy box.  The toy box is full of Kevin’s castoff cars and action figures.  I wanted to add something a little softer and gentler.  The monsters are fun to make and only take a couple of skeins.  I’m going to do a two color one next.  Maybe the “Irving” pattern. 

Friday, July 26, 2013

Easy Peasy!


One of my favorite garden crops is snow peas.  These are called “Melting Sugar”.  Home-grown snow peas are crisper than the ones I find in the produce aisle of the grocery store.  Those are always a little wilty from sitting around.  Mine stay crisp in the vegetable drawer for at least a week as I accumulate enough from daily pickings for a stir fry or salad.

As shown in the picture, snow peas can be grown in largish containers.  Simply plant and water. Easy peasy -- anyone with a 3 x 6 deck or sunny spot can do it.  They (the peas, not the gardeners) need something to climb on, like a trellis.  A couple of years ago, the local birds discovered the sprouts and left them looking like they’d been attacked by tiny scissors.  After that, I draped the trellis with bird netting.  That seems to solve the problem, and the peas like to climb on the netting as well.  They make a nice green and edible privacy screen.

I pick the pods when they are 3-4 inches long.  When they get going, they should be picked once or twice a day.  I like to snip off the ends, and pull off the strings if there are any. I cut them into 1 ½ inch pieces and toss in near the end of a stir fry so they just warm through or add them raw to a salad.

Quinoa salad is a summer favorite at our house.  I start with leftover quinoa and mix in a little balsamic vinaigrette to keep it from sticking together.  Mix in chopped snow peas, cucumber, sweet pepper, cherry tomatoes, and any other raw vegetables you enjoy.  Before serving, mix in a little more vinaigrette and some cubed cheese and chopped avocado.  Instead of the cheese, you could add cubed cooked chicken or ham.  If you don’t care for quinoa, you could substitute rice or pasta.  When I make this with pasta, I marinate the salad in Italian dressing, then add ranch dressing at the end to coat the pasta and make the dressing a little creamy.  These are two cool summer salads that we enjoy when the temps reach the 90s, like they have this week.

Regrettably, my peas don’t care for the hot weather, so they are done for the season.  When the pods start to get thick and curl, it’s off to the composter for them.


Saturday, May 18, 2013

Into the Ground


We’ve been having a leap-frog spring, one in which the temperatures have hopped over the normal highs in the 60s and 70s right to the 80s. That might seem like a good thing for a gardener, but really it’s not, because it just makes me feel like I’m a month behind, when according to the calendar, I’m really  a little ahead of schedule.  Normally, I gauge my planting of tender annuals and heat-lovers like tomatoes and peppers by a last-frost date around Mothers’ Day.  This year, Mothers’ Day is on the early side, but our highs from two weeks ago (60s) are suddenly our lows.  Cool season plants, like Swiss chard and snow peas, are fainting like Victorian ladies at a Chippendales’ show.   My tomato and pepper seedlings are not ready for this kind of intensity; they look like beach bunnies who forgot their sunscreen. 

Homeless seedlings
I’m trying to get my seedlings into the ground, but starts need a week of gradual acclimatization in the real outdoor sun, adding an hour or two per day.  That’s why some of these are looking a little beat up.  A week of travel to California left them neglected, and I lost a few.  The real challenge is that I started cucumbers and squash at the same time and neglected to mark them carefully.  I’m assuming that the cucumbers were the most sensitive and succumbed, but I can’t tell, at this time, which ones survived.  I bought more cucumbers, so come harvest time, I may be surprised to have more cucumbers that I planned on.  

  
I added potatoes to my garden this year, but no sprouts are showing yet.  This is making me very nervous, but I’m resisting the temptation to excavate to see what’s happening.  

Potatoes should appear here^

While cleaning out the raised bed, I found a couple of over-wintered onions and, gift from some passing bird, a volunteer strawberry. 

The way that nature perpetuates itself always makes me smile. We have a clump of strawberries right below the spot under the eaves where birds nest every year.  The only explanation I can think of is that the birds were eating the strawberries that were planted on the other side of the yard and “deposited” the seeds below their nest. 

Saturday, April 13, 2013

Signs of Spring


first starts


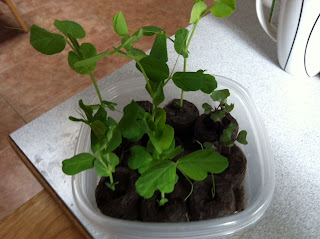
Spring comes late in the Pacific Northwest, with many false starts and broken promises.  A bright, sunny day reaching toward temperatures in the seventies will be followed by an inch of snow or a bruising hail storm.  The most reliable “last frost date” is around Mothers’ Day, so our growing season is brief and gardeners try to make the most efficient use of the growing time they do have. As a result, we are now in that seasonal limbo known as “indoor seed starting” that results from our illicit love affairs with seed catalogs.  Lesser gardeners may prefer to wait for the seedlings to appear in garden shops, but the variety and provenance of these is limited.  There is so much to know about new varieties that won’t fit on the little plastic tags that are inserted into the soil surrounding the garden-center plants, whereas the catalogs seduce us with the details of days to maturity, growth habits, and special characteristics of each type of seed. Seedlings from a store are o.k., but really, you don’t know how they’ve been treated or what they’re capable of.


"Scout the Destroyer"
If you start your own seeds indoors, you can choose fewer plants of a larger variety of tomatoes or cucumbers, instead of committing to six of one type.  Also, you can baby the tender ones indoors until the seasons have made up their minds.  In my garden, the birds view those first seedlings as a salad bar placed for their convenience; the first green shoots hardly stand a chance. Plus there is the havoc that the paws of a 100-pound Labradoodle can wreak with one enthusiastic romp through the emerging rows. Because of these considerations, I now have rows of veggie starts lined up under a grow light like race horses in the starting gate, waiting for the first gunshot of spring.


Peat Pellets
I like to use those dehydrated peat pellets because when they are soaked in warm water, they expand in a manner that reminds me of those Fourth of July tablets we would light on fire that produced twirling, writhing ashy “snakes” for our amusement.  Of course, the peat pellets are not quite that dramatic.  They just grow taller and mushy.  They are easy to plant and I think it’s less disruptive for the seedlings’ roots to not be extricated from a pot.  Repurposed clear plastic bakery trays work well as containers, and the lids can be closed to create a steamy little seed sauna for the first week or so until shoots appear. The trays tend to crack once the seedlings gain some weight, but they were trash anyway, right?
Seedlings under growlight

 Once the sprouts get some leaves, they should be placed outdoors (as the weather improves) for longer and longer periods of time to become acclimatized to wind, sun, and cooler temperatures.  This is the process known as “hardening off.” The tricky part is remembering to bring them in before the sun gets too intense or the temperatures approach freezing.  The sight of a sunburned cucumber plant is very sad, and I even had a couple of summer squash plants shrivel on a brisk morning even though their taller, sturdier siblings were fine. They did recover indoors under the grow light but it was a chilling (pun intended) reminder of what can happen.


Ready to Plant!
So now, a month before Mothers’ Day, I’m going to set out some snow peas, Swiss chard, bok choy, and Chinese mustard because they are cold hardy and should tolerate the light frosts we will still get.  Fingers crossed, but I also bought a “blanket” of row cover.

Friday, March 29, 2013

Genius, Part 2


As much as I love these felted slippers, they do have one fatal flaw.  The softness that makes them so cozy , also is not very durable for walking on. 


Add caption
 Sadly, the bottoms wear out fairly quickly.  While they are not terribly expensive or difficult to replace, I just couldn’t toss out something that was only worn out on the bottom.  So I decided to try to save these favorite slippers. 


I cut off the bottoms....
Slipper on left has been surgically altered.


and stitched on a pair of slipper sock soles I had lying around. 

Stitching in progress

I never got around to making the slipper socks, but now I have….


drumroll, please…….


RETREADS! 
 I’m thinking these bad boys should last forever!!

Saturday, March 9, 2013

Genius, I tells ya, genius!


Remember those grade-school aptitude tests where you had to look at a flat diagram with a dot on it and then predict where the dot would be when the diagram was folded into a cube? I   thought I was pretty good at that, but this pattern completely blows me away.  It’s called Midnattsol’s feltedslippers. 
  The pattern starts out as a row of squares knitted in alternating colors with two other squares picked up and knitted on the sides. When stitched together like one of those cube diagrams, it makes a bootie shape. 
 Even after sewing up four of these, I still can’t see how the shape goes together until the last seam.  I can’t imagine being able to visualize and design this pattern, but I love the magic of seeing it take shape.
The best thing about these slippers is that they are felted, which makes them soft and dense.  Felting is also great because it disguises any minor mistakes and sloppy seaming.   Also, the slippers are knit in garter stitch, so, simple even for a beginner. You could make these for friends and let them felt them to custom fit – you can control the shrinkage by monitoring the felting process.
 I love the harlequin design and the way they end up look like jester booties.  I used inexpensive but sturdy Paton’s classicwool.  Two skeins will make a pair of slippers with quite a bit of yarn left over.  Because this yarn felts easily, the leftovers can be used in a variety of ways, which I’ll show you soon.


I’ve already worn out one pair of these slippers and made a second pair. The simplicity and functionality of this design are genius.